Picture
The day started off as a puzzle - looking at the SIP plans, deciding where to start and then searching through the piles of panels to find all the right ones (just like building Legos!)  Once again the Traverse proved invaluable to move the panels from the street up to the building site.  But, as you will see in the pictures, sometimes it's just faster to grab a panel and throw it over your shoulder.  Which is exactly what Art did when he realized they had pulled a wrong panel! 

The task didn't get any easier when another flat bed truck loaded with more SIPs showed up around 11:30.  The puzzle work stopped for the crew to once again unload the panels. The front of our house was beginning to look like the Insulspan factory we had seen weeks before!

We were fascinated by the variety and size of the SIPs.  Some of the panels were huge (for the roof?), some were so small (see Ralph holding one of these) and some had extra reinforcement with LVL (laminated veneer lumber). 

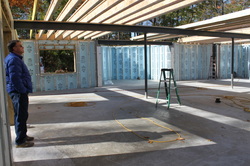
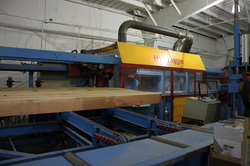
More about SIPS (skip this part if you don't want to read the technical details!!)  As I mentioned before, the Insulspan Structural Insulating Panels are “sandwiches” of performance-rated oriented strand board (OSB) structurally laminated to a continuous core of expanded polystyrene (EPS) insulation.  For our house our wall 'sandwiches' are 6.5 inches thick and 10.5 inches for the roof.  SIP construction is very popular with timber frame construction because the timbers, not a wood frame, support the house.  Using the pre-made SIP's reduces construction time and improves energy efficiency.  Once complete, we will have R values of 23 for the walls and 40 for the roof.  In addition to the increased R value, SIP construction prevents air movement caused by gaps around wood framing and by settling of insulation.  The continuous core of EPS insulation in SIPs reduces air leakage and heat loss, while allowing better control of indoor air quality.  All windows and most door openings (not our front door) are pre-cut at the factory, further simplifying the construction process.
  
To install a panel, 2x6's are first nailed along the edge of the plate.  The 2x6 is lined with a special sealant/adhesive designed to seal off gaps and act as an adhesive.  The SIP is raised and put in place over the 2x6 (the OSB board extends beyond the polystyrene on both sides so it fits snuggly over the 2x6).  The panel is connected to an adjacent panel or to the frame with very long screws - 8 and 10 inches long.  At the bottom, just above the plate, the OSB is nailed to the 2x6. Two part expanding foam is injected into certain joints and any gaps or voids, as needed. 

Once the crew installed a few fairly simple panels, Art decided to tackle the SIPs for the bay window, a far more complex installation.  Since this was Art's last day on site, he wanted to give Barry as much exposure to as many types of installations as possible.  Barry and Art finished the day by going over the SIP plans in great detail and discussing the plan for the rest of the installation.  It was Art's feeling that the entire structure would be enclosed within three weeks, providing the weather cooperated!  

We said our thanks and good-byes to Art and headed home.  Watching the SIPs being installed was very interesting but in a strange way it almost seemed a shame to enclose the frame.  But, living there without benefit of the walls and insulation wouldn't work either!!


Picture
Art told us the SIP truck was scheduled to arrive between 8:00 and 10:00 am so we decided to sleep in a bit and get caught up with some work.  We arrived at the site around 10:00 am and there were SIPs piled high around the cul-de-sac.  The truck was long gone!  It didn't look like there were enough panels for the whole house, including the roof.  As we later learned, two more trucks would follow with the remaining panels.  The crane had arrived but not the operator who was Amish.  He could operate the crane but not drive it to the site!
 
Art and his crew were busy raising the replacement braces that had arrived safely on the SIP truck and a couple of other smaller (!) beams that they could manage with the help of the Traverse.

Today presented the biggest challenge of the entire job - installing the beams at the peak of the house.  The first thing the crane did after it was in position was to lift a 25 foot piece of scaffolding that was supported by the "basket" (the red platform on the Traverse's forks) and carefully threaded through two top beams already in position.  At one point Art realized they forgot to put one of the braces on the Traverse before it was raised.  But the Traverse and the crane were already occupied, so Art put the brace on his shoulder and climbed up the ladder.  Now that's back breaking work!  And, Murphy was at work on this one...Art had grabbed the wrong brace so this time Chip carried the replacement brace up the ladder!  (see the pictures!) 

The most difficult piece to put in place was actually a "sub-assembly' of two rafters and a perlin (the perlin connects two rafters) which formed a large H.  The rafters are each 17 feet long and the perlin, 16.5 feet long.  This was one LARGE assembly that had to be lifted up and over the peak.  Other than the drone of the crane and the wine of the generator, no one said a word as we watched it swing and sway as the crane hoisted it slowly and carefully up into the sky.  I suspect I wasn't the only one holding my breath!  Art attached a rope to the one corner to help guide it but with something that massive, a piece of rope wasn't terribly effective!  As the operator lowered the piece into place there was a man at every corner to guide each beam into the designated slot.  How critical it was that this assembly and the rest of the structure be 'square' or all four pieces wouldn't fit.  As they were trying to wedge it into place the whole assembly slipped a couple of inches. It made quite a loud noise and I shrieked, totally forgetting that the crane was still holding it, just not taught! After getting three corners securely in place they detached the crane sling and attached it to the horizontal beam at the peak.  The crane actually lifted the whole house which created enough give to pop in the fourth corner.  Whew!  What a relief when that one was done!

After that challenge I think they decided to take a breather and install some easier beams.  The next two beams were the ones we were waiting to see - the year 2010 was hand carved in to each one.  One carving will be visible when you walk in our front door and the other will be visible from the great room.  The first beam glided into place but the second one almost got away from the crane operator.  It was swinging too much and hit adjacent beams several times. I winced and cringed every time it hit.  I think the operator was a little overwhelmed at that point.  

Ralph and I had an appointment so sadly we had to leave for about an hour and a half.  By the time we returned everything was completed including one final complex section of joinery which formed an inverted V in the great room.  While the crew cleaned up we walked around the perimeter of the house, admiring the structure from all angles. 

In just two and half days the timber was raised - how amazing!  Looking at the structure I realized it was even more beautiful than anything I had seen in the all the books I have through for so many years.  I realized it exceeded my expectations and my dreams.

Tomorrow is SIP day - we are curious to see how they are installed.  Where do they start?  How are they attached to each other and the plate?  How does one go on top of another?  How are they installed in areas where there are no timbers?  It will be very interesting but at the same time it is almost a shame to cover up all that wood!

 
Picture
Today was the day we have planned for, dreamed about and often thought would never come!  But it did and it was fantastic - better than anything we ever imagined! 

We got to the site around 8:00 am and, much to our surprise, the two main bents that were assembled the previous day were already up and standing!  We walked around the entire foundation admiring the bents, completely in shock at their size and beauty.  They looked so different from when they were lying on the plate, almost as if they had come to life when they were raised! 

With the assistance of a very talented crane operator, the crew was raising the next bent (assembled the previous day after we left), perpendicular to the two standing bents.  As large as the structure was it seemed to glide into place with minimal assistance from Art or one of the others.  One thing that particularly captivated me was watching them slide the posts into the holes in the plate.  Despite their size it reminded me of putting together a jigsaw puzzle or assembling Lincoln Logs! Everything has to fit in just the right place! 

We couldn't have asked for better weather.  The day started out cool but the clouds cleared by mid-morning to reveal a crystal blue sky with temps rising into the low 60's - a gift for early November! 

Assembly continued all morning with the crane picking up the huge pieces of wood and guiding them into place, directed by Art and the architectural plans.  The crew climbed ladders or were lifted up by the Traverse to connect the beams and braces.  There were some tight fits and difficult joints, particularly when the steel plates were involved.  The large beams were surprisingly maneuverable and the guys were very creative at getting them into position.  I found myself holding my breath on more than one occasion!  Just when it looked like a piece wouldn't fit, it would pop right into place.  I loved seeing the joints coming together and watching the pegs being pounded in.  To, me the pegs meant success and completion!  Art even let us pound in a peg and, as I found out, it was harder than it looked!  There were some bumps and knocks and a few adjustments here and there but the assembly went very smoothly.  It certainly spoke to the incredible accuracy of the cutting done in Blissfield as well as Art's experience with the assembly process!

By 3:00 all of the wood that could be installed was in place and the crane was sent on it's way (also interesting to watch!).  The remaining beams in the great room will be finished tomorrow when the new pieces arrive along with the SIPs.  We took a walk up to the RV garage to get a view of the whole house and marveled at how much work had been done in one day!  It really was starting to look like a house and as impressive as the wood looked sitting in the open we could only speculate at what it will look like when it's enclosed!

As we walked back to our car we were shocked at how tired we felt; it was as if we were the ones doing the lifting and the moving.  Although we were on our feet a good part of the day out in the fresh air, we agreed that the excitement and anxiety were the real causes of our exhaustion. 

What a day, what a day! I really don't have the words to describe how it felt to have a dream come true before our very eyes!  Although watching the SIPs being installed will be interesting, I doubt tomorrow will begin to compete with our experiences today.


Picture
Although I'm not a pessimist by nature, on the drive to Strasburg I was all but convinced that something had gone wrong and the truck wouldn't be there.  Fortunately, I was wrong!  We got to the site at 9:30 and the truck was there and almost halfway unloaded.  Barry was moving the wood with a piece of equipment called a Traverse (looks like an overhead fork lift to me).  He was zipping around the property carefully creating stacks and stacks of wood.  Timbers of all sizes and shapes were everywhere!  He looked like he was having much too much fun!  He really showed off his skills as he carried four pieces of wood that were wider than the driveway and extended beyond both of the flanking trees.  I held my breath!  The last piece of wood to come off the truck is called an architectural glulam.  A glulam is 16 2 x 6 boards that are stacked on top of each other and glued together, forming a beam.  The glulam will provide support in the ridge of the garage which is made of only SIPS with no timber support.  This engineered beam is requird because the span is 33 feet long, much too great for a single piece of wood. 

Once the wood was unloaded and sorted it was time to grab a quick lunch and wait for the crane to show up.  While we were at lunch Art, our advisor from Riverbend, discovered that one of the posts was cut incorrectly.  Maybe my worries of the morning were coming to fruition!  Unfortunately, it was one of the larger posts and to have it re-made would delay the raising for a minimum of three weeks.  Not good.  Art made numerous calls to the designers and engineers in Blissfield as they poured over the plans, discussing alternatives.  He finally called us over to explain the situation and the proposed solution.  The first time he explained it I was convinced he was speaking Greek.  Even Ralph didn't understand!  Reading the architectural plans with our untrained eyes was no easy task.  Seeing the glazed look in our eyes, Art had a great idea: he used a visual aid!  He inserted a small beam from one of the piles into a post on the ground to demonstrate the problem.  Ahhh, the light bulb went on!  He assured us that, visually, it would take a protractor to tell the difference and that they would only need to make a couple of replacement braces to accomodate the change. The braces would be delivered with the SIPs on Thursday.  Problem solved!

When Art first discovered the problem he immediately put a hold on the crane.  Crane time is expensive and the last thing anyone wants is a crane sitting idol.  But the day was not lost as there was plenty of work to be done assemblying the bents.  Fortunately, the Traverse can handle a lot of the "lifting" at lower heights - perfect for moving the heavier pieces of wood into position.  As we watched, the first bent was assembled.  Steel plates were inserted at the main joints to provide support and a very long threaded rod was inserted at the peak. Large metal pegs were pounded into the wood through the metal plates.  All of the other joints were joined with oak pins.  I was amazed at what a finished look the oak pins gave the bent.  Speaking of being amazed, we were both completely blown away by the size and the beauty of the wood.  Some of the knots in the wood almost looked like art work! 

After the first bent was completed they started on the second bent that they actually assembled on top of the first bent.  This puts both bents in position to be lifted, one at a time, by the crane and positioned on the steel beams, through the plate. 

After the first bent was finished it was time to head back to Lancaster and check in with the office.  We didn't do anything strenuous but all the fresh air and excitement left us exhausted and eager for tomorrow!

 
Picture
No wedding this Saturday - but we were thoroughly surprised when Lauren showed up at a party we were attending at a friend's house in New Jersey!  So, Saturday the whole family made a quick visit to the site.  The plate  and backfilling around the foundation were done.  The ground was leveled in the garages and filled with stone, ready for the cement foundation.  Beau took great delight in running around the plate and leaping off the sides - making me very nervous.  I could only hope he had good depth perception and wouldn't jump off the south side, above the walk out basement!  We followed him as he raced up to the RV garage, chasing shadows of several very large birds.  More excavation was done for the RV garage which resulted in a very large pile of dirt.  Be sure to see the picture of Beau playing king of the mountain! 

 
Picture
By Friday afternoon three Amish workers were finishing up the plate.  The only thing left to be done is to cut the holes in the plate where the wooden posts will rest on the metal support posts. The floor definitely helps define the foot print of the house but it still looks so small!  The view at the basement level changed, too - it was dark and cold without the sun!  The joists looked so neat and organized.   

 
Picture
Although we were only away for two days, Monday and Tuesday, work on our house proceeded at a feverish pace!  Cement had been poured for the basement floor and was completely cured by the time we got to the site this morning.  The men were busy working on the plate (aka first floor).  They were laying long wooden joists across the entire width of the foundation, resting on the center steel beam.  As we learned from Barry (who will be heading up the crew to raise the timbers), additional Laminated Veneer Lumber (LVL's) boards will be strategically placed among the regular joists to provide additional support required to support the weight of the timbers.  Wood structural panel sheathing (WSPS) will then go around the perimeter of the joists to keep them upright and in position and provide weatherproofing.  As we were checking out our basement we noticed that the remaining steel posts had been installed.  These are the posts around the perimeter that will eventually support the massive timbers: in essence they are what support the entire house!  We took a quick hike up to the northern side of the property and saw that the RV garage was now staked out - more progress!!

 
Picture
This was truly a once in a life time day! Promptly at 9:30 am, cameras in hand, we met Luke (Production Manager), Tom (Logistics Supervisor) and Bruce (Eastern Region Sales Manager and our tour guide for the day!) at Riverbend's production office.  Ralph helped Tom locate our house (it's not on any maps yet) and then we donned our high fashion safety glasses and made our way out to the production area.  Riverbend is really two plants: 1) Riverbend Timber Frame which creates the actual timbers and 2) Insulspan which creates the SIPS (Structural Insulated Panels).  The two production facilities are in separate buildings, joined by a dust collection system.  As a result of this separation the Insulspan Plant was unaffected by the recent fire except for some minor electrical disruptions which were fully restored during the weekend of the fire.

We started our tour on the Riverbend side and were introduced to the machine you see above, known as the Hundegger K2. It is a computer aided cutting machine that picks up a timber and moves in into position in the cutting bay.  Then, based on the program for that piece, it cuts the timber to the specified size, cuts any angles, cuts out the mortises (male ends) or tenons (female ends), drills holes for the pegs, or any other necessary cuttings.  The machine moves the timber along a track as the cutting tools move into position to make the very precision cuts.  The cutting devices (knives, saws, blades) are very sharp and are typically sharpened every day.  The entire machine is also calibrated daily. Once all the cuts are made, the machine moves the timber out of the bay and down the steel track to be inspected (by a human!) and removed from the platform by a fork lift.  It is then brought out to the production floor and a special wax based sealant is applied to open grain wood such as Timber ends and mortises.  Ralph and I were mesmerized by the whole process and had difficulty grasping that these were the posts and beams that would be holding up our house!

In some cases additional cutting that can't be done by the K2 machine is done by hand.  Examples would be cutting an arch in a brace, carving a date or cutting more complex joinery.
  
Once the timbers are cut they are assembled on the shop floor to properly pre-fit the joinery, square the bents, and drill the oak pins. This process insures that installation at the building site can be done quickly and accurately and eliminates on-site cutting or adjustments.  Once the timbers are properly fit, all the parts are disassembled and stacked by number (each piece is numbered according to the plan and hand initialed by the person who cut it!).

After this process, the timber is then put through another machine, the HM4, which planes the wood and adds any specified chamfers (cuts on the vertical edges for design purposes).  The planing process smoothes out the wood and removes any markings or damage to the surface of the wood. 

The final step, which we did not see, is the application of an oil that is designed specifically for unseasoned stock.  "Green" or "unseasoned" timbers still have to dry after finishing.  The finish is designed to breath, allowing moisture to pass through without causing damage. This method of oiling timbers gives the wood a finished look without hampering the seasoning process.

Bruce had to all but drag us away from the K2 so we could move on to the Insulspan operation.  This is where the SIPS (Structural Insulated Panels) are manufactured.  All though SIPS aren't quite as exciting as timbers, they are an important part of the timber frame building process.  SIP's are comprised of oriented strandboards (OSB) that are held like the wafers of a sandwich by the inner layer Expanded Polystyene, which is the insulating core.  With this design, SIPs have superior insulating qualities and produce a super tight building envelope or shell.  The SIPS will be used both for our exterior walls and the roof of our house and the RV garage.  Each SIP is computer designed to be cut specifically to our house plan and to integrate with the timbers.  All of the openings for windows and doors are pre-cut, again to insure accuracy and ease of installation at our home site. 

Both Ralph and I love to see how things are made so we really enjoyed watching the OSB and Polystryene "sandwiches" being made and cut.  On our way out, Bruce showed us the machine that creates the "wire chases" through the polystyrene to accommodate the wiring in the house.

Bruce took us back to the Riverbend side where they were pre-assembling a bent (a bent is the combination of posts and beams, typically spanning a specific area).  As we soon learned, this was the bent that will support our front porch.  This moment was the pinnacle of our trip to Michigan - it made the wait and the trip so worthwhile! After looking at plans for so many months and even looking at the foundation back in Strasburg, this was reality.  Here, in front of our very eyes, was the wood that would span the 30 feet of our front porch.  It looked so big and the wood was so beautiful.  It actually brought tears to my eyes as, at that moment, I realized this represented the reality of my dream of a timber frame home.  After all the planning and worrying, I could finally see and touch the real thing.  And this was just what was outside - I could only imagine what will be inside!! 

After taking many, many pictures, Bruce dragged us away and reluctantly we returned our protective eye wear as we left the building!  We hopped in our car and followed Bruce to the other end of town to Riverbend's Corporate and design office.  We toured the offices and spent some time talking with Marty Birkenkamp, Design Manager and Chuck Meyer, Vice President.  We were impressed with the caliber of every employee we met, at every level.  Everyone was enthusiastic about their work, interested in us as customers and seemed very contentious about their jobs.  

After our tour, Bruce took us back to town (population 2300!) and treated us to a delightful lunch at The Stable.  He told us a great story about Marty on the night of the fire:  At 2:00 in the morning, as the fire raged on, Marty was on the scene chasing after the Firemen yelling "I have a key, I have a key", trying to prevent them from chopping away at the building with their big axes!

After lunch, at my request, we made one more quick visit to the Riverbend facility in hopes that we might see another bent being assembled.  Sadly, nothing was on the floor, but we did get to see two of the largest timbers that will be in our house -32 feet long.  And that's 32 feet in one continuous piece - imagine the size of the tree that came from!

Although we both hated to leave, it was time to get on the road home.  With 510 miles to cover we were already leaving later than we had planned  - 1:45 pm.  We thanked Bruce profusely and left Blissfield, grinning from ear to ear.  We were exhausted from the excitement but couldn't stop talking about our experience.  We made it home by 10:45, totally exhausted.  But what a day it was!